



Managing Virtualization
5 minute read
Virtual machines provide isolated computing environments that run alongside your TrueNAS system. TrueNAS Connect makes it easy to monitor and manage your virtual machines through the Applications screen.
Before You Begin
Ensure you have:
- Virtual machines configured on your TrueNAS system.
- Appropriate permissions to manage virtual machines.
- Access to the TrueNAS Connect interface.
Accessing Virtual Machine Management
To access virtual machine management:
- Navigate to Dashboard > Applications.
- Locate the Virtual Machines section on the Applications screen.
The Applications screen shows three main sections: Apps, Containers, and Virtual Machines. The Virtual Machines section displays all VMs configured on your system.
Understanding the Virtual Machines Interface
The Virtual Machines section provides a comprehensive view of your VMs.
Virtual Machine List
Each virtual machine appears as a row in the table with:
- Name: The VM identifier (e.g., TNCTest).
- Status: Current operational state (RUNNING, STOPPED, etc.).
- Expand button: Click to access detailed information and controls.
Expanding Virtual Machine Details
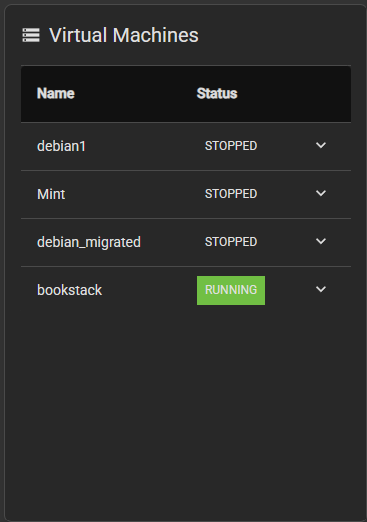
Click the expand button (down arrow) next to any virtual machine to reveal control buttons and virtual machine information.
Control Buttons
Three primary action buttons appear at the top:
- Start: Powers on a stopped virtual machine.
- Stop: Gracefully shuts down a running virtual machine.
- Restart: Reboots the virtual machine.
Note: The Start button appears disabled when a VM is already running. Only available actions are enabled based on the current VM state.
Virtual Machine Information
The expanded view displays key VM specifications:
- Status: Current operational state.
- Autostart: Whether the VM starts automatically with the system.
- vCPUs: Number of virtual CPU cores allocated.
- Memory: Amount of RAM assigned to the VM.
- Bootloader: Boot method (UEFI, BIOS, etc.).
Managing Virtual Machine Operations
Starting a Virtual Machine
To start a stopped virtual machine:
- Navigate to the Applications screen.
- Locate your virtual machine in the Virtual Machines section.
- Click the expand button to show VM details.
- Click Start.
The VM begins the boot process and the status updates to RUNNING.
Stopping a Virtual Machine
To stop a running virtual machine:
Navigate to the Applications screen.
Locate your virtual machine in the Virtual Machines section.
Click the expand button to show VM details.
Click Stop.
This opens the Stop VM Options dialog with configuration choices:
Stop Options
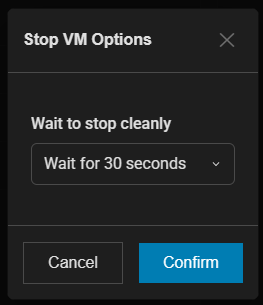
Timeout: Select how to shut down the VM:
- Force shutdown now — immediately powers off the VM without a graceful shutdown.
- Wait for 30 seconds (default) — waits 30 seconds for a graceful shutdown.
- Wait for 1 minute — waits 1 minute for a graceful shutdown.
- Wait for 5 minutes — waits 5 minutes for a graceful shutdown.
Each wait option forces shutdown if the VM is still running when the time elapses.
Warning: The Force shutdown now option can cause data loss if the VM has unsaved work. Use a wait option first to allow the VM to shut down gracefully.
- Select an option from the Timeout dropdown.
- Click Confirm to stop the VM.
Restarting a Virtual Machine
To restart a running virtual machine:
Navigate to the Applications screen.
Locate your virtual machine in the Virtual Machines section.
Click the expand button to show VM details.
Click Restart.
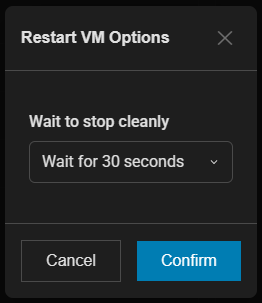
This opens the Restart VM Options dialog with the same configuration options as stopping:
Restart Options
Timeout: Select how to shut down the VM before it restarts:
- Force shutdown now — immediately powers off the VM without a graceful shutdown.
- Wait for 30 seconds (default) — waits 30 seconds for a graceful shutdown.
- Wait for 1 minute — waits 1 minute for a graceful shutdown.
- Wait for 5 minutes — waits 5 minutes for a graceful shutdown.
Each wait option forces shutdown if the VM is still running when the time elapses.
- Select an option from the Timeout dropdown.
- Click Confirm to restart the VM.
The VM shuts down gracefully (or forcefully if specified) and then automatically starts up again.
Monitoring Virtual Machine Status
Status Indicators
Virtual machines display status information in multiple locations:
- Main table: Shows current status (RUNNING, STOPPED, etc.).
- Expanded details: Provides additional status information.
- Status badges: Use color coding for quick identification.
Real-time Updates
The interface automatically updates to reflect:
- Status changes during start/stop operations.
- Resource usage updates.
- Configuration changes.
Using the Mobile and Responsive Interface
On mobile devices, the virtual machine interface adapts:
- Simplified view: Shows VM name and status in a compact format.
- Touch controls: Tap to expand and access detailed information.
- Slide panels: VM details open in slide-out panels for better mobile navigation.
Taking The Next Steps
After learning to manage virtual machines, consider exploring:
- Health Reporting to monitor VM performance and system health.
- Managing TrueNAS Systems Inventory to track VM hardware specifications.
- Managing the Keyring for secure API key storage and authentication.
Troubleshooting
Virtual Machine Does Not Start
- Verify the VM configuration in TrueNAS.
- Check available system resources (CPU, memory).
- Review TrueNAS logs for startup errors.
Virtual Machine Does Not Stop
- Try a longer wait option in the Stop VM Options dialog.
- Select Force shutdown now if the VM does not stop on its own.
- Check if the VM has active connections preventing shutdown.
Status Does Not Update
- Refresh the Applications screen.
- Verify network connectivity to your TrueNAS system.
- Check TrueNAS system status.